
Create New User and assign Permission Sets : Using Business Central Administration shell

Hi Folks,

In this blog we will see how we can create new users and assigning permission sets using Business Central Administration shell step by step:-

Step-(1) Run Business central Administration Shell as Run as Administrator.

Step-(2) Then just Run the below mentioned command and pass unique Windows account tagged with BC user and Server instance as shown below:

new-navserveruser


Step-(3) New user (Kunal Blog) with blank permission set is now created as shown below:
Step-(4) Now Run the below command to assign permission sets and pass the PermissionSetId, WindowsAccount & ServerInstance as parameter:
New-NavServerUserPermissionSet

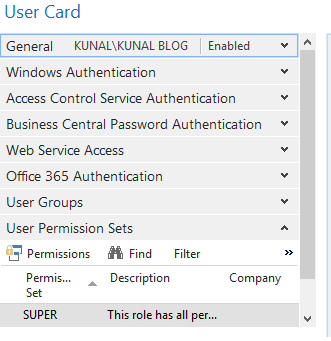
Step-(5) Permission Set Id is now assigned as shown in User Permission Sets tab:

Note- (1) Pass the correct parameters as Windows Account & Server Instance based on your config.

(2) We can also create the same using PowerShell ISE.


I hope this will help you to create new users & assign Permission sets in Business Central.

Thanks for Reading!!!

Comments

Popular posts from this blog

Amount In Words in Navision / Business Central

Hi Guys, In this article, we will see how to display amount in words in Microsoft Dynamics Business Central. Here, I am taking an example of Report object  which is widely used in Navision for converting decimal amount field into words. Procedure :-  Step-1 Declare the following Global Variables :         RepCheck:  Report  "Check";         NoText:  array [ 2 ]  of   Text ;         AmountInWords:  Text ; where, (1) RepCheck is a variable of  Report DataType Named as " Check " which is 1401. (2) NoText is a variable of DataType " Text " with array Dimension value as 2 which is defined as shown above. (3) AmountInWords is a variable of DataType " Text " which will store final result of amount in words. Step-2 Now, add the following code in OnAfterGetRecord() trigger of DataItem containing that decimal field value. So in my custom Purchase Order Report, i am adding code in the Purchase Header (DataItem) - OnAfterGetRecord() trigger.   trigger  OnA

Flow Custom field to G/L Entry and other Posted tables : From Purchase Order to Posted Purchase invoice

Hi Readers, In this blog we will see how we can transfer data from " Purchase Header" to "Purchase Invoice Header" & "G/L Entry" table in Business Central. In this example, will create "Remarks" field on Purchase Header table and after posting, flow it to Purchase Invoice Header & G/L Entry tables: Firsly, create required fields ("Remarks") in below mentioned tables by creating table extensions: Purchase Header (38) Purch. Inv. Header (122) Gen. Journal Line (81)  G/L Entry (17) For the Purch. Inv. Header table, you can just create copy the field from purchase header and paste it in  Purch. Inv. Header  table. If the field ID No. is same for that field for both the tables then you don't have to code i.e, it automatically transfer that field data from Purch. Header to Purch. Inv. Header . Step-(1)   tableextension   50104  "Purchase Header Ext"  extends  "Purchase Header" {      fields     {         

Calculate Date : Using Date Formula and CalcDate Function in Navision/BC

 Hi Everyone, In this article we will see how we can Calculate Date by adding and subtracting No. of Days / Months based on CalcDate and DateFormula datatype. Here, I define three variables required for: (1) " No of Days " -  To define No. of Days / Months as required. You can also use these units denoted as: <Unit> = D | WD | W | M | Q | Y (D=day, WD=weekday, W=week, M=month, Q=quarter, Y=year). (2) " From Date " and " To Date "  Date type Variables to store calculated date in it. page   50103  "Date from Date Formula" {     PageType = Card;     ApplicationArea = All;     UsageCategory = Administration;     SourceTable =  Integer ;      layout     {          area( Content )         {              group( General )             {                  field( "No. of Days"; "No. of Days" )                 {                     ApplicationArea = All;                 }             }         }     }      actions     {          area