
How to Connect Business Central with Visual Studio Code - Part-2

Hi Everyone,

In this blog we will see how we can Install & Connect VS Code with Microsoft Dynamics 365 Business Central 2019 W1 On Premise.

As discussed in earlier post, we have seen steps to Download & Installation of Microsoft Dynamics 365 Business Central W1 (On-Premise). You can refer below mentioned link for Part-1:

Step-(1) Install Visual Studio Code by following below snapshots:

Step-(2) Click Install & then click on Finish button.

Step-(3) Now Open Visual Studio Code, On Extension Management Tab (Ctrl + Shift + X),  Install the  AL Language Extension Version v7.4.496506.

Step-(4) Now Open Command Pallet and search AL:Go command & hit enter.

Step-(5) Now tag the Folder Name or Path where the Project/Extension Files stores.

Step-(6) After this, we have to select the Target Platform which means exact BC version we have already installed in the system.

7.0 - For BC 2021 Wave1. [BC18]
6.0 - For BC 2020 Wave 2. [BC17]
5.0 - For BC 2020 Wave 1. [BC16]
4.0 - For 2019 Wave 2. [BC15]
3.0 - For BC Spring 2019. [BC14]
2.0 - For BC Fall 18. [BC13]
1.0 - For BC Spring 18. [NAV 2018]

Step-(7) Now, Choose the server for SaaS select Microsoft cloud sandbox or for On-Prem select Your own server.

Step-(8) Now. in app.json file, change the value of defined parameters accordingly 


  • Server - define localhost initials in case of on-Prem.
  • Server Instance - Name of service defined during Installation.
  • Authentication - (i) Windows - using same system authentication OR (ii) User Password - need to specify the user password to authenticate.
  • Port - Bydefault Development port is 7049,In Case of change during installtion specify exact Development port like: "Port" : 8049, or any
Note:- Before downloading the symbols, Make Sure you have enabled checkbox for Enable Developer Endpoint parameter in Business Central Administration. 

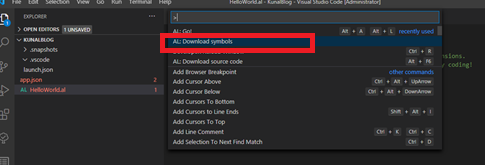
Step-(9) Now, just download the symbols using the command Pallet (Ctrl+Shift+P) & select AL:Download Symbols.

Step-(10) Now Run without debugging using (Ctrl + F5), and finally the package will published successfully.

And you can enjoy your further development ;)


I hope this will help you to setup your Development environment in Business Central On-Premise version.

Thanks!! Stay connected for more articles :)

Comments

Popular posts from this blog

Amount In Words in Navision / Business Central

Hi Guys, In this article, we will see how to display amount in words in Microsoft Dynamics Business Central. Here, I am taking an example of Report object  which is widely used in Navision for converting decimal amount field into words. Procedure :-  Step-1 Declare the following Global Variables :         RepCheck:  Report  "Check";         NoText:  array [ 2 ]  of   Text ;         AmountInWords:  Text ; where, (1) RepCheck is a variable of  Report DataType Named as " Check " which is 1401. (2) NoText is a variable of DataType " Text " with array Dimension value as 2 which is defined as shown above. (3) AmountInWords is a variable of DataType " Text " which will store final result of amount in words. Step-2 Now, add the following code in OnAfterGetRecord() trigger of DataItem containing that decimal field value. So in my custom Purchase Order Report, i am adding code in the Purchase Header (DataItem) - OnAfterGetRecord() trigger.   trigger  OnA

Flow Custom field to G/L Entry and other Posted tables : From Purchase Order to Posted Purchase invoice

Hi Readers, In this blog we will see how we can transfer data from " Purchase Header" to "Purchase Invoice Header" & "G/L Entry" table in Business Central. In this example, will create "Remarks" field on Purchase Header table and after posting, flow it to Purchase Invoice Header & G/L Entry tables: Firsly, create required fields ("Remarks") in below mentioned tables by creating table extensions: Purchase Header (38) Purch. Inv. Header (122) Gen. Journal Line (81)  G/L Entry (17) For the Purch. Inv. Header table, you can just create copy the field from purchase header and paste it in  Purch. Inv. Header  table. If the field ID No. is same for that field for both the tables then you don't have to code i.e, it automatically transfer that field data from Purch. Header to Purch. Inv. Header . Step-(1)   tableextension   50104  "Purchase Header Ext"  extends  "Purchase Header" {      fields     {         

Calculate Date : Using Date Formula and CalcDate Function in Navision/BC

 Hi Everyone, In this article we will see how we can Calculate Date by adding and subtracting No. of Days / Months based on CalcDate and DateFormula datatype. Here, I define three variables required for: (1) " No of Days " -  To define No. of Days / Months as required. You can also use these units denoted as: <Unit> = D | WD | W | M | Q | Y (D=day, WD=weekday, W=week, M=month, Q=quarter, Y=year). (2) " From Date " and " To Date "  Date type Variables to store calculated date in it. page   50103  "Date from Date Formula" {     PageType = Card;     ApplicationArea = All;     UsageCategory = Administration;     SourceTable =  Integer ;      layout     {          area( Content )         {              group( General )             {                  field( "No. of Days"; "No. of Days" )                 {                     ApplicationArea = All;                 }             }         }     }      actions     {          area